
If you’ve never used Microsoft Word’s Track Changes feature before, the idea of getting your manuscript back from an editor filled with all sorts of lines and squiggles you have to do something to in order to keep your novel from plummeting precipitously through a fiery ring of digital destruction and disappearing into the black maw of—
Whoa, there. Seriously, Track Changes isn’t that terrifying. Let’s take this one step at a time.
BUT FIRST—WHAT NOT TO DO: Don’t try to revise your manuscript by opening the file with tracked changes and beginning to click through it one edit or comment at a time. A typical full-length edited manuscript contains between 10,000 and 30,000 revisions—that’s right, tens of thousands. Clicking through each one is a sure path to wasted time, hard liquor, and seething regret.
Don’t try to manually transfer or key in the changes from the edited manuscript to another file. The chances of successfully completing that without introducing errors are minuscule. And did I mention you’d be handling an average of 10,000 to 30,000 revisions?
1. First, turn off the Revisions Pane.
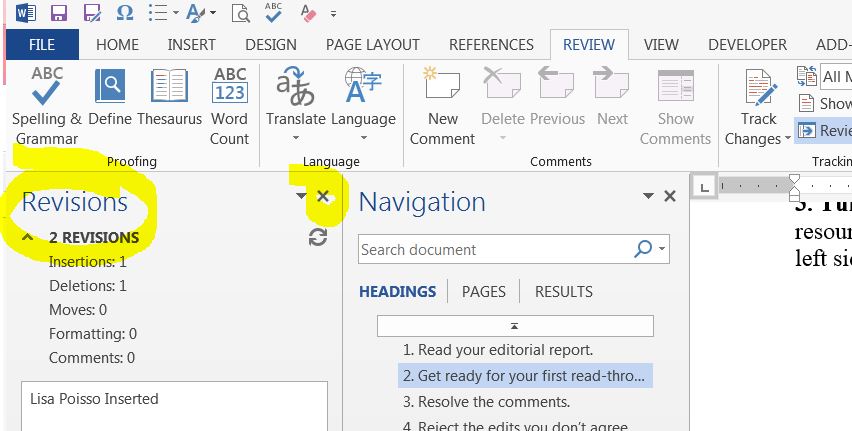 The Revisions Pane is the devil; it gobbles computer processing resources like lost souls. If it’s already turned on, you’ll probably see it in a tall column on the left side or possibly horizontally at the bottom of the screen.
Click the X on the top right corner of the pane. Begone, foul Revisions Pane!
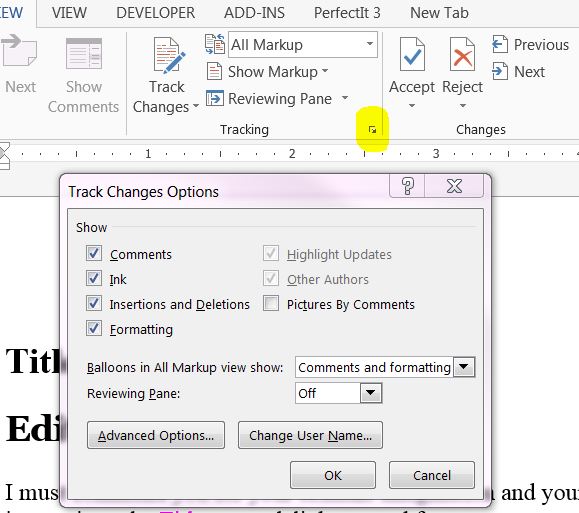
Instead, send comments to the balloons. On the Review tab, click the little pull-out arrow at the bottom right of the Track Changes area. Check everything in the left column to select it, set “Balloons in All Markup view show” to “Comments and formatting”—and, of course, make sure the foul Revisions Pane is set to Off.
Your options may vary slightly if you have an older or Mac version of Word, but it should look something like this:
2. Before you hit the edits, resolve the comments.
If you work through comments with Track Changes turned off, your revisions make won’t produce more tracked changes. Some writers like to work that way. If you work through comments with Track Changes turned on, your revisions will be tracked. In that case, there’s no need to highlight and accept them as you work; that’ll happen automatically in a future step.
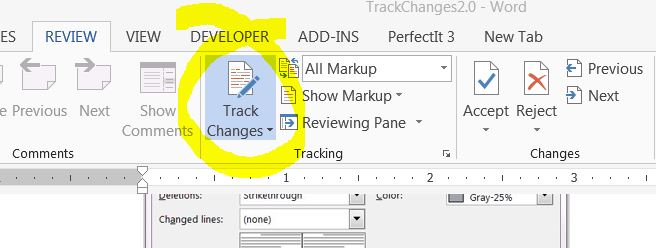
To toggle Track Changes on or off, click the big Track Changes button near the middle of the Review tab. If the button is highlighted/colored, Track Changes is on.
Go through the entire manuscript doing nothing but dealing with the comments. If you’re working with the clean edited file, keep in mind only comments requiring further revision will appear on the file; anything pertaining to content that was removed will be gone, so check the PDF to get the whole picture.
As you resolve each issue, delete the comment by clicking the Delete button on the Review ribbon, or right-click on the comment itself and select Delete Comment. Don’t mark them Done, which leaves them hidden in your file.
Any questions from me in the comments are prompts and clarifications. You don’t need to reply to me; instead, clarify the issue in the manuscript in a way that’s clear to readers.
3. Almost time for the edits: Get a handle on Track Changes.
If you’re new to using Track Changes, watch this brief Track Changes video tutorial from my colleague and friend Katherine Trail. If you run into more questions or problems, I like this thorough explanation of how to use Track Changes.
For help with instructions that don’t cover your version of Word, run a Google search for: track changes Word [date of your Word version]. And if you’re still having trouble, email me.
4. One more thing: Change the color of the edits.
I know that what I’m about to say sounds just like a BuzzFeed headline, but … You Won’t Believe How Much Easier Your Edits Will Be To Read if you change the colors of the additions and deletions.
Unfortunately, Track Changes colors are saved locally on each computer, so the settings that I use won’t “stick” to the manuscript when I send it back to you. You’ll have to make these changes on your own computer. Give it a try—your brain will thank you for giving it a more intuitive sense of the markup.
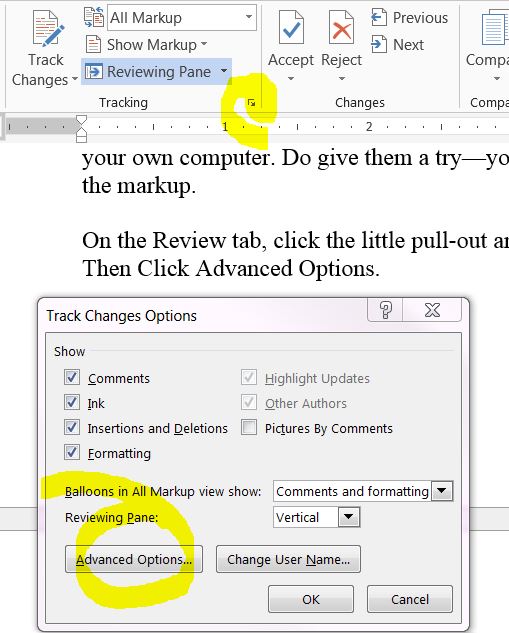
On the Review tab, click the little pull-out arrow at the bottom right of the Track Changes area. Then Click Advanced Options.
You may be tempted to go crazy with a personalized palette, but the color scheme I’m about to recommend makes reading markup downright intuitive. Set Insertions to Teal and Deletions to Gray – 25%. Then set Moved From to Gray – 25% and Moved To to Teal.

Don’t change anything else. You’ll find the gray deletions fade away into the background and the teal insertions pop out, minus the sting—bonus!—typically associated with red ink.
5. Reject or revise the edits you do not agree with.
Accepting an edit makes it part of your manuscript; rejecting a comment deletes it. To begin accepting and rejecting edits, make sure Track Changes is turned on. (See step 4, above.)
For this pass, focus only on rejecting edits you do not want to keep—that is, things you want left as you originally wrote them. To reject an edit, highlight the text containing the edit and press the Reject button on Review ribbon. You can also right-click on the highlighted text and choose Reject from the menu that pops up.
If you find yourself rejecting multiple edits per page, ask yourself why you’re ignoring the professional advice you paid for.
You can also choose to revise an edit that you’d like to keep. If you originally wrote she hissed and your editor changed it to she said, but you’d prefer to change it to an action beat (She hurled the heavy pot into the sink, contents and all), this is the time to make that revision. Type in the new text. Don’t bother highlighting and accepting your own correction; that’ll happen automatically in the next step.
The process of rejecting edits should be light and easy. If you find yourself rejecting multiple edits per page, ask yourself why you’re ignoring the professional advice you paid for. If anything seems arbitrary, please don’t stay silent and dark. Let’s talk. I can explain the reasoning behind any of the edits.
Again, skim right past all the edits you agree are on target. All you’re doing in this step is rejecting edits you don’t want to keep or revising them in a way you prefer. You’ll end up with a manuscript full of edits you want to keep in exactly the form you want to keep them.
6. Accept All edits.
Accept all the rest of the edits at once using the Accept All Changes command. On the review ribbon at the top of the screen, click the arrow at the bottom of the Accept button and choose Accept All Changes.
Since you’ll be accepting many more edits than you’ll reject, you’ve just saved hours and processed your edit in a fraction of the time and clicks.
7. Clear remaining comments and edits.
By this point, you shouldn’t have any remaining comments. If you do, now’s the time to get rid of them. Save yourself the time, agony, and potential embarrassment of sending out your edits and comments.
REALITY CHECK: Marking comments done, or setting your document view not to show tracked changes or comments, does not remove them from your file. Marking changes as “Done” may be your way of showing you’re done with them—but alas, that doesn’t mean they’re done with your manuscript.
An easy way to find remaining edits is to click the big Next button just to the left of the Accept and Reject buttons on the Review tab. You can do the same with comments by clicking Next on the big button in the comments area.
When you’re certain you’re ready to delete any last comments, go to the Delete button in the Comments area of the Review tab, click the dropdown arrow, and choose Delete All Comments in Document. If the button was grayed out, there are no remaining comments.
Again, to be perfectly clear:
- Marking comments as done does not remove them from your file.
- Using a document view that doesn’t show tracked changes does not remove them from your file.
Don’t leave any editorial comments or unaccepted edits in your document. You don’t want to send a file containing tracked changes or comments to the next publishing professional—a copyeditor or proofreader, a cover designer, a formatter, a literary agent, a publisher … Heck, not even me, not even for a sample edit.
Nothing should leave your hands that’s not the very best existing version of your work, free from anyone else’s lingering contributions (including edits, comments, notes, and questions from formatters).
Now you’re ready to move ahead to the next step in your journey to publication.

Understanding how stories work changes everything. I’ll show you how to back up your creative instincts so your ideas hit home. It’s time to accelerate your journey from aspiring writer to emerging author.
Ready to get serious about your book? Apply to work with me.
track changes, Microsoft Word, revisions, how to use Track Changes