

Writing is such a minuscule part of the writing a novel. People who’ve never written anything longer than a school paper have a hard time imagining that pouring all those words onto the page isn’t the major part of the battle, but experienced authors know better.
While the writing process hogs the public spotlight, revisions are where a manuscript comes to life.
What is revision?
A first draft is a diamond in the rough. The story stumbles over plot holes and pacing problems. The writing reveals all your foibles and bad habits. The finer touches of thematic development and literary craftsmanship may be entirely missing.
This is what the revision process is for. Revision is so much more than cleaning and polishing your writing. Revising your manuscript happens at every stage of developing your novel.
Revision begins the moment you first imagine an idea for a story. Is the concept strong enough to support an entire novel? Revising your manuscript continues at the story level as you outline and develop your story. You’ll revise your outline as you write. You’ll revise your story once you finish the first draft and again after alpha and beta readers chime in. You’ll tune the character motivations, you’ll pump up the conflict and tension, you’ll revise the narrative arc.
You won’t be ready to begin revising the actual writing and words until line editing or copyediting are peeking over the horizon.
It’s not necessary to fret over the distinction between revision (tweaking what you have) and rewriting (revamping the entire thing). What’s important is the distinction between story revision and writing revision. It’s easy to let tuning your writing suck up your time and creative energy while the fundamental and more difficult work of tuning your story goes untouched. Don’t let those blasted commas and weasel words distract you. Story comes first.
The purpose of early revisions
As soon as you finish writing your story, put it away for as long as you can stomach. I recommend at least eight weeks. If you can manage to get away from your manuscript longer than that, so much the better. You need a fresh eye in order to perceive whether the story you’ve put on the page matches the story you’ve envisioned in your head.
Once your story seems new to you again, it’s time to revise your manuscript.
The most important thing is resisting the urge to fiddle. This is not the time to ponder word choice and commas. Early revision is about big-picture revision: plot, characterization, point of view, and so on. Don’t waste your time tweaking writing you may end up pulling up by the roots.
Your mantra: Don’t fiddle—revise.
How many drafts are enough?
The good news: smart revision will lift your book to its full potential. The less-good news: there will be many, many revisions.
- How many drafts should you write before editing? I recommend going through your manuscript six times.
- But some writers use more drafts—maybe even more than twenty. (“No, I’m not kidding,” writes agent Janet Reid.)
- You’re not ready to start polishing the writing until you’ve finished revising the story. Remember, don’t fiddle.
The role of critique and feedback
At some point, it’s time to lift your head up from the keyboard and get a second opinion. The first time you show your book to someone else can make you feel utterly naked, but you wrote this book for other people to read, right? Peer critique and alpha and beta reader feedback can help you pinpoint issues in your book you’re too close to spot yourself.
- Trust the ways that critique and feedback will help you improve your book.
- Friends and family are too close to give you objective feedback. Here’s how to find writing critique partners and groups no matter where you live and write.
It’s tough to sort out conflicting feedback from various sources, and too much input can leave you unsure which ideas to trust. Limit feedback to a handful or so of readers, then look for points of consensus. Individual comments often reflect individual reader taste. Look for issues mentioned by more than one reader. Readers may not explain themselves quite the same way, but you’ll be able to recognize when more than one person is having trouble with, say, understanding or caring why the main character is doing what they’re doing.
If you can’t make heads or tails of your feedback, there’s no sense banging your head against your manuscript at the writing level. Stop revising. Step away from the pages. Return to your outline or synopsis, or seek professional help with a manuscript critique or coaching.
The right tools to revise your manuscript
Combine chapters and scenes into a single manuscript file. You need to know the total length of your manuscript so you’ll know if you’re in range of the marketable word counts that agents, publishers, and readers will be looking for. You also need to be able to flip through the whole story to see the shape of the narrative arc and the character arcs, and you can’t do that across dozens of individual chapter files.
Here’s how to merge documents in Microsoft Word.
Reorganize your story with a single click. Thought you needed Scrivener for this? Nope, nope, nope. Word includes a feature called the Navigation pane that lets you hop directly to any chapter in your manuscript—or drag your chapters into an entirely different order, contents and all.
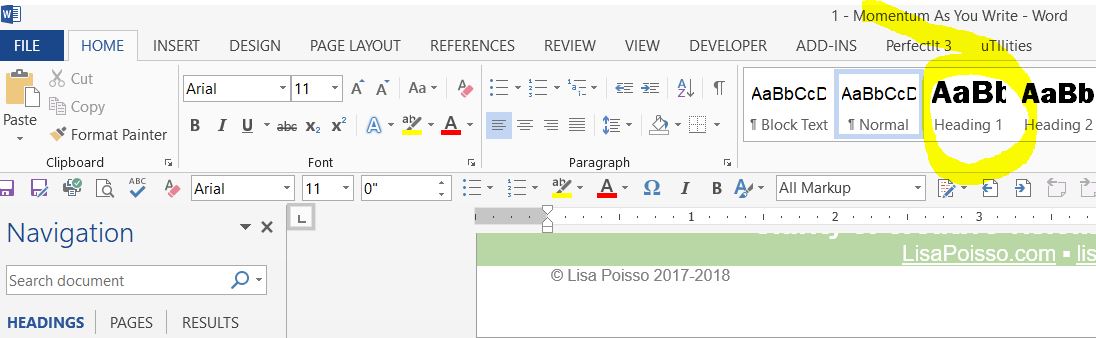
To enable this feature, set a heading style on your chapter headings. Click on the Home tab in Microsoft Word (top left corner of your screen). Now find the text in your manuscript that says Chapter 1. Put your cursor anywhere on that line (you don’t have to highlight it), and then click the big style box that says Heading 1; I’ve highlighted what that looks like below.
Repeat that process with the rest of your chapter headings. You can use Find with the word chapter to help you find them.
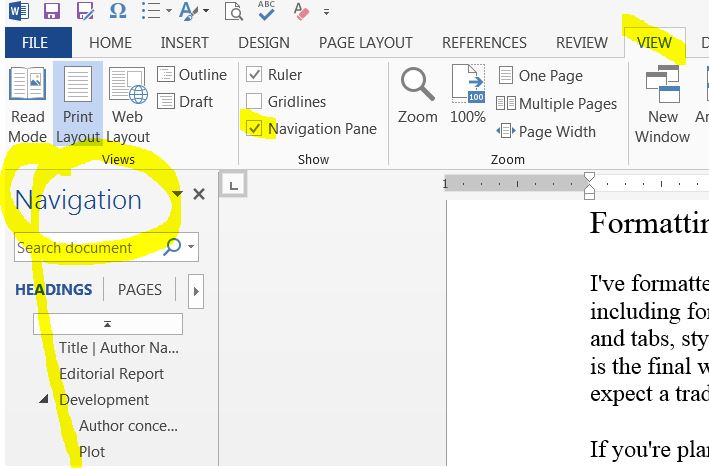 Once all your chapter headings are styled as Heading 1, turn on the Navigation pane. Go the View tab (a little left of center at the top of your screen); now below that, look for the Show section (second section from the left). Check the last box, which says Navigation pane. This turns on the Navigation pane.
Now you can click on any chapter in the Navigation list to go straight to the chapter. You can also use the Navigation list to drag and drop the chapters, contents and all, into a different order. Word will move all the text in the chapter along with the heading—fantastic for shuffling things around during early drafts and major revisions.
Keep track of your document files. Prevent confusion over manuscript versions with a file-naming system that keeps you on track.
Clean up the final product. Most self-editing tools create more tangles than they resolve (please avoid Grammarly), but you won’t go wrong running your completely revised manuscript through Microsoft Word’s native spell check feature as a final self-editing step. The grammar feature can be questionable, but a spell check will help you catch many basic errors and spot inconsistencies. Here’s how to use MS Word’s spell check.
Another tool that I recommend is the free online Consistency Checker from Intelligent Editing. It will help you with hyphenation inconsistencies, spelling variations, and more without adding the sort of misinformed grammar suggestions so common with programs like Grammarly. If you go looking around at the Intelligent Editing site, don’t be tempted by the more complex software designed for editors; that’s too granular. You want the free Consistency Checker.
Create your manuscript revision plan
Okay, let’s do this thing. Here’s what you need to consider when creating your own manuscript revision plan.
- Begin by creating your own revision plan.
- Develop your story sensibilities by honing your big-picture revision skills.
- Come to grips with real-world writing: why story structure won’t squelch your creativity.
- Taste the salty and inimitable Chuck Wendig’s twenty-five steps to “edit the unmerciful suck out of your story.”
- Discover the secret to nailing your final draft so that everything comes together. You’ll need a synopsis for so many reasons.
- Map it out. If you’re a client, ask me for a copy of my Story and Scene Book Map template; it’s a big ol’ spreadsheet that helps you track your narrative arc and make sure every scene is earning its keep. Or visit Jami Gold’s worksheets for writers page, including beat sheets, book maps, and worksheets designed to help you with plot arcs, character arcs and romance novels—plus resources inspired by the methods of Blake Snyder (Save the Cat) and Larry Brooks (Story Physics and Story Engineering).
- Emma Darwin empathetically explains how to tackle revision tasks in an incremental manner. (Bonus: she warns against fiddling, too. We’re taking away all the fiddles!)
- Write it down. Make lists of anything you might need to keep track of: timelines, character details, locations, etc. You won’t be able to spot inconsistencies if you can’t remember what you wrote in the first place.
Editing: The revision continues
You’re not done with revision just because you’ve sent your manuscript off to an editor. A developmental or line edit isn’t a fix; it’s a road map that tells you where you could take the story and writing to make them that much better. The journey itself is up to you.
When you get your edit back, you’ll have a whole new list of suggested revisions to work through. Arm yourself with the Author’s Survival Guide to Track Changes to simplify the process.
Need a hand with revision? Investigate the ways a spot of story coaching could get you unstuck in the short term or keep you moving in the long run.
Onward to the draft of your dreams!

Understanding how stories work changes everything. I’ll show you how to back up your creative instincts so your ideas hit home. It’s time to accelerate your journey from aspiring writer to emerging author.
Ready to get serious about your book? Apply to work with me.